You’ve successfully completed your dental implant surgery at a trusted practice in Bowling Green. Now, a new phase begins: recovery. This period is just as crucial as the procedure itself, as it lays the foundation for your implant to fuse securely with your jawbone—a process called osseointegration. For patients in Warren County, knowing what to expect day-by-day and how to leverage local resources can transform recovery from a source of anxiety into a manageable, straightforward journey. This local guide provides clear, practical answers to your most pressing aftercare questions, from the first critical hours to long-term maintenance, empowering you to heal confidently and ensure the long-term success of your new smile.
Table of Contents
Key Takeaways (TL;DR)
- Immediate Action is Key: The first day focuses on controlling bleeding with gauze and minimizing swelling with ice packs. Rest and a liquid diet are non-negotiable.
- Swelling Follows a Predictable Pattern: It typically peaks 48-72 hours after surgery. Consistent icing for the first two days is your best defense for a comfortable recovery in Bowling Green.
- Gentle Hygiene Prevents Problems: After 24 hours, begin gentle saltwater rinses. Careful brushing that avoids the surgical site is critical to prevent infection and promote healing.
- Your Diet Directly Supports Healing: Stick to nutritious, soft, and cool foods for at least a week. Avoid straws, spicy foods, and hard items that can disrupt the delicate implant recovery site.
- Healing is a Long-Term Commitment: Full osseointegration (bone fusion) takes 3-6 months. Attending all follow-up visits and committing to specialized long-term oral hygiene ensures your implant lasts for decades.
- Local Knowledge Eases the Process: Knowing where to find pharmacy services, soft-food options, and gentle places to walk, like Keriakes Park, can make your recovery in Warren County significantly smoother.
What Should I Do in the First 24 Hours After Surgery?
The immediate post-operative period sets the stage for your entire healing process. Your primary goals are to control bleeding, minimize swelling, manage discomfort, and protect the surgical site. Here is your essential checklist.
Your Immediate “Do” Checklist:
- Control Bleeding: Bite down firmly on the sterile gauze packs placed over the surgical site for 30-60 minutes. Replace them as needed if oozing persists.
- Minimize Swelling: Apply an ice pack to the outside of your cheek in a 20-minutes-on, 20-minutes-off cycle for the first 24 hours. This is one of the most effective steps you can take.
- Manage Pain Proactively: Take your prescribed pain medication or recommended over-the-counter analgesics (like ibuprofen) before the local anesthesia fully wears off.
- Rest: Keep your head elevated with pillows, even when sleeping. Avoid all strenuous activity.
Your Critical “Don’t” Checklist:
- Don’t Rinse or Spit: Avoid rinsing your mouth for the first 24 hours. When you need to swallow, do so gently to avoid disturbing the blood clot.
- Don’t Use a Straw: The suction can dislodge the clot and lead to a painful complication called dry socket.
- Don’t Smoke or Use Tobacco: Nicotine severely restricts blood flow, dramatically slowing healing and increasing the risk of implant failure.
- Don’t Probe the Area: Avoid touching the site with your fingers or tongue.
Diet for the First Day: Stick to cool, liquid foods. Room-temperature broth, yogurt, applesauce, and nutritional shakes are ideal. Proper hydration is also crucial for healing.
What Should I Expect During Days 2-7 of Recovery?
As you move past the first day, your routine will shift. Swelling often peaks around day two or three before gradually subsiding. This is the week to establish gentle hygiene and a nutritious soft diet.
Initiating Gentle Oral Hygiene
After 24 hours, you can begin gentle rinsing to keep the area clean. Use a warm salt water rinse (1/2 teaspoon salt in 8 oz. water) after meals and before bed. Gently swish and let it drip out—no vigorous spitting. You may also brush your teeth, but carefully avoid the surgical site for the first few days.
Expanding Your Soft Diet
You can gradually introduce more substantial soft foods. Think mashed potatoes, scrambled eggs, oatmeal, well-cooked pasta, and flaky fish. Continue to avoid foods that are crunchy, spicy, very hot, or require chewing near the implant site. Remember: no straws.
Activity: Light walking is encouraged, but continue to avoid bending, lifting, or strenuous exercise that could increase blood pressure and cause throbbing or bleeding at the site.
How Does Healing Progress in Weeks 2-4?
By the second week, most significant swelling and discomfort should have resolved. You’ll likely have a follow-up visit at your Bowling Green dental practice to remove any non-dissolving sutures and check on your progress. This is a period of transition and continued, more subtle healing.
Signs of Normal Healing vs. When to Call Your Dentist
- Gradually fading pink or reddish gum tissue.
- Mild, manageable tenderness to touch.
- No foul taste or persistent throbbing pain.
- Sutures feeling loose or dissolving.
- Throbbing pain that increases or isn’t controlled by medication.
- Swelling that suddenly worsens after improving.
- Pus, a bad taste, or foul odor from the site.
- Bleeding that doesn’t stop with gentle pressure.
- Fever over 101°F.
Diet & Activity: You can slowly reintroduce more solid foods as comfort allows, but still avoid putting direct chewing pressure on the implant site if you have a temporary crown or healing abutment. You can usually resume most normal activities and light exercise, but always listen to your body.
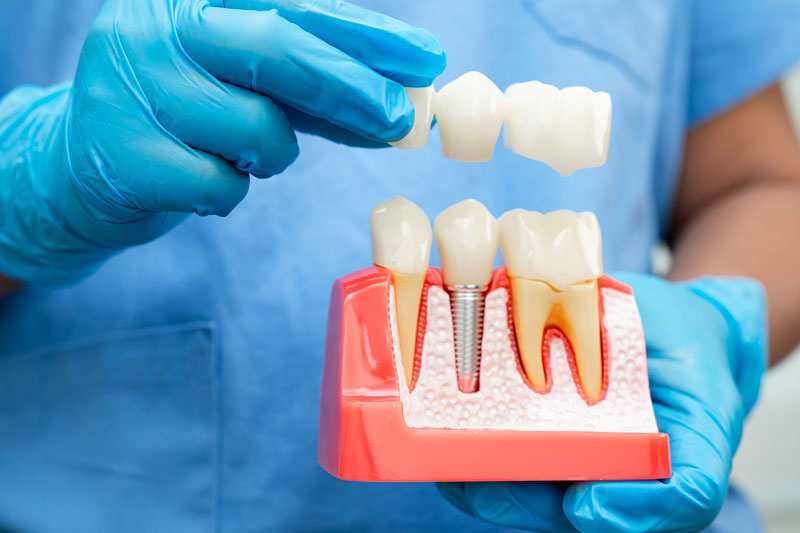
What Happens During the 3-6 Month Osseointegration Phase?
This is the most critical biological phase of your implant recovery. While the gum tissue has healed, the titanium implant is silently integrating with your jawbone in a process called osseointegration. This bone fusion provides the immovable stability that makes implants so durable.
Lifelong Care: Once your final tooth is attached, care resembles that of a natural tooth but with extra vigilance. Use a soft-bristled brush and non-abrasive toothpaste. Clean meticulously around the implant crown with floss threaders, interdental brushes, or a water flosser. Your twice-yearly professional cleanings in Bowling Green are essential to monitor the health of the implant and surrounding bone.
What Local Resources in Bowling Green Can Aid My Recovery?
A smooth recovery isn’t just about clinical instructions; it’s about practical comfort. Knowing your local options can make a significant difference. Here’s a toolkit for Bowling Green and Warren County residents.
Nutrition & Comfort
Stock up on soft, nutritious foods. Consider:
- Smoothies & Yogurt: Many local cafes and Chaney’s Dairy Barn offer excellent options.
- Broths & Soups: Perfect for the first few days. Many restaurants on Scottsville Road offer take-out.
- Mashed Vegetables & Protein: Soft foods like mashed sweet potatoes, scrambled eggs, and flaky salmon are great for later in the first week.
Pharmacy & Supplies
Convenient pharmacy access is key for prescriptions and supplies.
- Fill any prescribed medications promptly at a pharmacy near you.
- Purchase extra gauze, sterile saline for rinsing, a soft-bristle toothbrush, and over-the-counter pain relievers as recommended.
- Pharmacies along major corridors like Campbell Lane and Nashville Road offer drive-through options for added convenience.
Rest & Gentle Activity
Once you’re feeling up to it, gentle walking aids circulation and mood.
- Take a slow, flat stroll through Keriakes Park or along the paved paths of the RiverWalk at Mitch McConnell Park.
- Enjoy the serene scenery at Lost River Cave (walking paths only, avoid boat tours until fully healed).
- Listen to your body—rest is still a priority.
Frequently Asked Questions About Implant Recovery in Bowling Green
A successful dental implant recovery in Bowling Green is achieved through a partnership between you and your dental team. By understanding what to expect, following aftercare instructions meticulously, and using local resources wisely, you actively contribute to the long-term health and stability of your implant. This careful attention during the healing phase is the final, vital step in securing a functional, comfortable, and lasting smile.
Strategic CTA (Retention – Post-Treatment): Successfully navigating recovery leads to the final, exciting step. To understand what happens when your permanent, custom-made restoration is attached, revisit our detailed guide on the dental implant process in Bowling Green.
About the Author & Practice Leadership
Dr. Devin T. Hall, DMD, and the clinical team at Chandler Park Dental Care in Bowling Green, KY, are committed to supporting patients through every phase of the implant journey. From precise surgical planning to clear, compassionate post-operative guidance, they ensure each patient has the knowledge and resources needed for a smooth recovery and optimal outcome. Their patient-centered approach emphasizes education and open communication, helping residents of Warren County feel confident and cared for from consultation through long-term maintenance. This article was medically reviewed by Dr. Austin Delpont, DMD, partner at Chandler Park Dental Care.
Sources & References
- International Journal of Implant Dentistry. Clinical recommendations for postoperative care after implant surgery: A systematic review. 2023.
- Journal of Oral and Maxillofacial Surgery. Patient-related risk factors for implant failure after immediate implant placement: A retrospective study. 2024.
- American Dental Association (ADA). Oral Health Topics: Dental Implants.
- Academy of Osseointegration. Guidelines for Peri-Implant Care and Maintenance. 2024.
Last reviewed: December 2025